CyberArk Conjur
| Feature | Support | Description |
|---|---|---|
| Reading Secrets | ✅ | Read secrets e.g OPENAI_API_KEY |
| Writing Secrets | ✅ | Store secrets e.g Virtual Keys |
| Deleting Secrets | ❌ | Secrets must be removed via policy updates |
Read and write secrets from CyberArk Conjur (self-hosted secrets manager)
Step 1. Add CyberArk Conjur details in your environment
LiteLLM supports two methods of authentication:
- API key authentication -
CYBERARK_API_KEY(recommended) - Certificate authentication -
CYBERARK_CLIENT_CERTandCYBERARK_CLIENT_KEY
CYBERARK_API_BASE="http://your-conjur-instance:8080"
CYBERARK_ACCOUNT="default"
CYBERARK_USERNAME="admin"

# Authentication via API key (recommended)
CYBERARK_API_KEY="your-api-key-here"

# OR - Authentication via certificate
CYBERARK_CLIENT_CERT="path/to/client.pem"
CYBERARK_CLIENT_KEY="path/to/client.key"

# OPTIONAL
CYBERARK_REFRESH_INTERVAL="300" # defaults to 300 seconds (5 minutes), frequency of token refresh
CYBERARK_SSL_VERIFY="true" # defaults to true, set to "false" to disable SSL verification (for self-signed certificates)
Step 2. Add to proxy config.yaml
general_settings:
  key_management_system: "cyberark"

  # [OPTIONAL SETTINGS]
  key_management_settings:
    store_virtual_keys: true # OPTIONAL. Defaults to False, when True will store virtual keys in secret manager
    prefix_for_stored_virtual_keys: "litellm/" # OPTIONAL. If set, this prefix will be used for stored virtual keys in the secret manager
    access_mode: "read_and_write" # Literal["read_only", "write_only", "read_and_write"]
Step 3. Start + test proxy
$ litellm --config /path/to/config.yaml
Writing Virtual Keys to CyberArk
When you create a virtual key in the LiteLLM UI, it automatically gets stored in CyberArk Conjur.
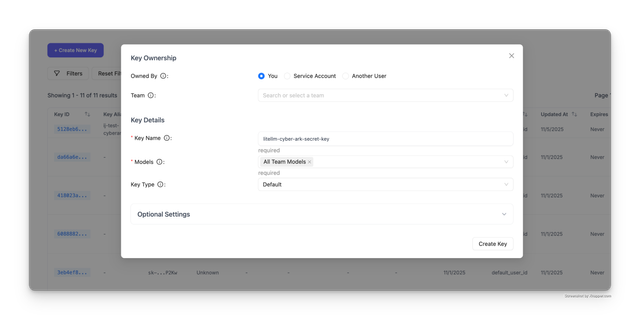
Step 1: Create a virtual key in the LiteLLM Admin UI
In this example, we create a key named litellm-cyber-ark-secret-key:
Step 2: Verify the secret exists in CyberArk
You can verify the virtual key was stored in CyberArk by querying the secrets API:
TOKEN=$(curl -s -X POST http://0.0.0.0:8080/authn/default/admin/authenticate \
  -d "your-api-key" | base64 | tr -d '\n')

curl -H "Authorization: Token token=\"$TOKEN\"" \
  "http://0.0.0.0:8080/resources/default/variable" | jq .
The response shows litellm-cyber-ark-secret-key exists in CyberArk:

The virtual key is stored with the full path: default:variable:litellm/litellm-cyber-ark-secret-key
How it works
Authentication
CyberArk Conjur uses a two-step authentication process:
- LiteLLM authenticates with your API key to get a session token
- The session token (base64-encoded) is used for subsequent API requests
- Tokens expire after ~8 minutes, so LiteLLM caches and refreshes them automatically
Reading Secrets
LiteLLM reads secrets from CyberArk Conjur using the following URL format:
{CYBERARK_API_BASE}/secrets/{ACCOUNT}/variable/{SECRET_NAME}
For example, if you have:
CYBERARK_API_BASE="http://conjur.example.com:8080"CYBERARK_ACCOUNT="default"- Secret name:
AZURE_API_KEY
LiteLLM will look up:
http://conjur.example.com:8080/secrets/default/variable/AZURE_API_KEY
Writing Secrets
When a Virtual Key is created on LiteLLM, the following happens automatically:
- LiteLLM creates a policy entry to define the variable in Conjur (if it doesn't exist)
- LiteLLM sets the secret value via the Conjur API
LiteLLM stores secrets under the prefix_for_stored_virtual_keys path (default: litellm/)
For example, a virtual key would be stored as: litellm/virtual-key-name
Important Notes
- Variables must be defined in a Conjur policy before setting their values
- LiteLLM automatically creates policy entries when writing new secrets
- Secret names with slashes (e.g.,
litellm/key) are automatically URL-encoded - Session tokens are cached for 5 minutes by default to minimize API calls
Troubleshooting
If you're experiencing issues with the LiteLLM integration, first validate that your CyberArk Conjur instance is working correctly. Run these curl commands directly against your CyberArk endpoints to verify connectivity and authentication:
Step 1: Authenticate and get a token
Replace http://conjur.example.com:8080 with your CYBERARK_API_BASE and use your actual credentials:
TOKEN=$(curl -s -X POST http://conjur.example.com:8080/authn/default/admin/authenticate \
  -d "your-api-key" | base64 | tr -d '\n')
Step 2: Test reading a secret
curl -H "Authorization: Token token=\"$TOKEN\"" \
  "http://conjur.example.com:8080/secrets/default/variable/test-secret"
Step 3: Test writing a secret
curl -X POST \
  -H "Authorization: Token token=\"$TOKEN\"" \
  --data "my-secret-value" \
  "http://conjur.example.com:8080/secrets/default/variable/test-secret"
If these commands work successfully against your CyberArk instance, then CyberArk is functioning correctly and the issue is with your LiteLLM configuration. Check that:
- Your environment variables are correctly set
- The
CYBERARK_API_BASEURL is accessible from your LiteLLM instance - Your API key or certificates have the necessary permissions in CyberArk
SSL Certificate Errors
If you encounter SSL certificate verification errors like:
RuntimeError: Could not authenticate to CyberArk Conjur: [SSL: CERTIFICATE_VERIFY_FAILED] certificate verify failed: self-signed certificate in certificate chain
This typically occurs when your CyberArk Conjur instance uses a self-signed certificate. You can disable SSL verification by setting:
CYBERARK_SSL_VERIFY="false"
Disabling SSL verification is insecure and should only be used for testing or development environments with self-signed certificates. For production, configure your certificate chain properly or use certificate-based authentication with CYBERARK_CLIENT_CERT and CYBERARK_CLIENT_KEY.
Video Walkthrough
This video walks through using CyberArk Conjur as a secret manager with LiteLLM. We create a virtual key in the LiteLLM Admin UI and verify it exists in CyberArk. Then we rotate the secret key and verify it exists in CyberArk.