Virtual Keys
Track Spend, and control model access via virtual keys for the proxy
Setup
Requirements:
- Need a postgres database (e.g. Supabase, Neon, etc)
- Set
DATABASE_URL=postgresql://<user>:<password>@<host>:<port>/<dbname>in your env - Set a
master key, this is your Proxy Admin key - you can use this to create other keys (must start withsk-).- ** Set on config.yaml** set your master key under
general_settings:master_key, example below - ** Set env variable** set
LITELLM_MASTER_KEY
- ** Set on config.yaml** set your master key under
(the proxy Dockerfile checks if the DATABASE_URL is set and then initializes the DB connection)
export DATABASE_URL=postgresql://<user>:<password>@<host>:<port>/<dbname>
You can then generate keys by hitting the /key/generate endpoint.
Quick Start - Generate a Key
Step 1: Save postgres db url
model_list:
  - model_name: gpt-5.6-terra
    litellm_params:
        model: ollama/llama2
  - model_name: gpt-5.6-luna
    litellm_params:
        model: ollama/llama2

general_settings:
  master_key: os.environ/LITELLM_MASTER_KEY
  database_url: "postgresql://<user>:<password>@<host>:<port>/<dbname>" # KEY CHANGE
Step 2: Start litellm
litellm --config /path/to/config.yaml
Step 3: Generate keys
curl 'http://0.0.0.0:4000/key/generate' \
--header 'Authorization: Bearer <your-master-key>' \
--header 'Content-Type: application/json' \
--data-raw '{"models": ["gpt-5.6-luna", "gpt-5.6-terra"], "metadata": {"user": "ishaan@berri.ai"}}'
What a key inherits from its owner
A key's owner is whoever its user_id points at, and that is not always the person who created it. /key/generate stamps the caller's user_id on the new key automatically only when the caller is not a proxy admin; a proxy admin has to pass user_id explicitly, so an admin-created key with no user_id has no owner and inherits nothing from the admin. Keys minted from the Admin UI for a specific user, and service account keys (whose user_id is always null), follow the same rule.
Inheritance is not uniform across permission surfaces. Model access and MCP access are always evaluated against the key row itself, while management-route access is decided by the role of the owning user, which is why a key owned by a proxy admin can call admin endpoints.
| Surface | What the key inherits from its owner | How to override it on the key |
|---|---|---|
| Models | Nothing when the key belongs to a team. On a key with no team_id, the owner's models list applies on top of the key's own list, and no-default-models on the owner denies everything outside a team | Set models on the key (or all-team-models to defer to the team) |
Management routes (/key/*, /user/*, /team/*) | The owner's role in full. If the owner is proxy_admin, every non-admin route restriction is skipped and the key can manage keys, users, and teams | Set allowed_routes on the key; it is enforced for every role, including admin-owned keys |
| MCP servers and tools | The owner's MCP entitlement as a ceiling, never as a grant, and an empty key list inherits the team's servers unless require_key_mcp_access_defined is on. Admin ownership grants no MCP access at all | Set object_permission.mcp_servers / mcp_access_groups / mcp_tool_permissions, or no-mcp-servers to opt out |
| Budgets and rate limits | The owner's tpm_limit and rpm_limit whenever they are set, and the owner's max_budget for keys with no team | Set the same fields on the key, or use a service account key to apply team limits only |
Spend Tracking
Get spend per:
- key - via
/key/infoSwagger - user - via
/user/infoSwagger - team - via
/team/infoSwagger - end-users - via
/end_user/info- Comment on this issue for end-user cost tracking
How is it calculated?
The cost per model is stored here and calculated by the completion_cost function.
How is it tracking?
Spend is automatically tracked for the key in the "LiteLLM_VerificationTokenTable". If the key has an attached 'user_id' or 'team_id', the spend for that user is tracked in the "LiteLLM_UserTable", and team in the "LiteLLM_TeamTable".
- Key Spend
- User Spend
- Team Spend
You can get spend for a key by using the /key/info endpoint.
curl 'http://0.0.0.0:4000/key/info?key=<user-key>' \
     -X GET \
     -H 'Authorization: Bearer <your-master-key>'
This is automatically updated (in USD) when calls are made to /completions, /chat/completions, /embeddings using litellm's completion_cost() function. See Code.
Sample response
{
    "key": "sk-tXL0wt5-lOOVK9sfY2UacA",
    "info": {
        "token": "sk-tXL0wt5-lOOVK9sfY2UacA",
        "spend": 0.0001065, # SPEND
        "expires": "2023-11-24T23:19:11.131000Z",
        "models": [
            "gpt-5.6-luna",
            "gpt-5.6-terra",
            "claude-sonnet-5"
        ],
        "aliases": {
            "mistral-7b": "gpt-5.6-luna"
        },
        "config": {}
    }
}
1. Create a user
curl --location 'http://localhost:4000/user/new' \
--header 'Authorization: Bearer <your-master-key>' \
--header 'Content-Type: application/json' \
--data-raw '{user_email: "krrish@berri.ai"}'
Expected Response
{
    ...
    "expires": "2023-12-22T09:53:13.861000Z",
    "user_id": "my-unique-id", # unique id
    "max_budget": 0.0
}
2. Create a key for that user
curl 'http://0.0.0.0:4000/key/generate' \
--header 'Authorization: Bearer <your-master-key>' \
--header 'Content-Type: application/json' \
--data-raw '{"models": ["gpt-5.6-luna", "gpt-5.6-terra"], "user_id": "my-unique-id"}'
Returns a key - sk-....
3. See spend for user
curl 'http://0.0.0.0:4000/user/info?user_id=my-unique-id' \
     -X GET \
     -H 'Authorization: Bearer <your-master-key>'
Expected Response
{
  ...
  "spend": 0 # SPEND
}
Use teams, if you want keys to be owned by multiple people (e.g. for a production app).
1. Create a team
curl --location 'http://localhost:4000/team/new' \
--header 'Authorization: Bearer <your-master-key>' \
--header 'Content-Type: application/json' \
--data-raw '{"team_alias": "my-awesome-team"}'
Expected Response
{
    ...
    "expires": "2023-12-22T09:53:13.861000Z",
    "team_id": "my-unique-id", # unique id
    "max_budget": 0.0
}
2. Create a key for that team
curl 'http://0.0.0.0:4000/key/generate' \
--header 'Authorization: Bearer <your-master-key>' \
--header 'Content-Type: application/json' \
--data-raw '{"models": ["gpt-5.6-luna", "gpt-5.6-terra"], "team_id": "my-unique-id"}'
Returns a key - sk-....
3. See spend for team
curl 'http://0.0.0.0:4000/team/info?team_id=my-unique-id' \
     -X GET \
     -H 'Authorization: Bearer <your-master-key>'
Expected Response
{
  ...
  "spend": 0 # SPEND
}
Model Aliases
If a user is expected to use a given model (i.e. gpt-5.6-luna), and you want to:
- try to upgrade the request (i.e. gpt-5.6-terra)
- or downgrade it (i.e. Mistral)
Here's how you can do that:
Step 1: Create a model group in config.yaml (save model name, api keys, etc.)
model_list:
  - model_name: my-free-tier
    litellm_params:
        model: huggingface/HuggingFaceH4/zephyr-7b-beta
        api_base: http://0.0.0.0:8001
  - model_name: my-free-tier
    litellm_params:
        model: huggingface/HuggingFaceH4/zephyr-7b-beta
        api_base: http://0.0.0.0:8002
  - model_name: my-free-tier
    litellm_params:
        model: huggingface/HuggingFaceH4/zephyr-7b-beta
        api_base: http://0.0.0.0:8003
  - model_name: my-paid-tier
    litellm_params:
        model: gpt-5.6-terra
        api_key: my-api-key
Step 2: Generate a key
curl -X POST "https://0.0.0.0:4000/key/generate" \
-H "Authorization: Bearer <your-master-key>" \
-H "Content-Type: application/json" \
-d '{
	"models": ["my-free-tier"],
	"aliases": {"gpt-5.6-luna": "my-free-tier"}, # KEY CHANGE
	"duration": "30min"
}'
- How to upgrade / downgrade request? Change the alias mapping
Step 3: Test the key
curl -X POST "http://0.0.0.0:4000/chat/completions" \
-H "Authorization: Bearer <user-key>" \
-H "Content-Type: application/json" \
-d '{
    "model": "gpt-5.6-luna",
    "messages": [
        {
            "role": "user",
            "content": "this is a test request, write a short poem"
        }
    ]
}'
Advanced
Pass LiteLLM Key in custom header
Use this to make LiteLLM proxy look for the virtual key in a custom header instead of the default "Authorization" header
Step 1 Define litellm_key_header_name name on litellm config.yaml
model_list:
  - model_name: fake-openai-endpoint
    litellm_params:
      model: openai/fake
      api_key: fake-key
      api_base: https://exampleopenaiendpoint-production.up.railway.app/

general_settings:
  master_key: os.environ/LITELLM_MASTER_KEY
  litellm_key_header_name: "X-Litellm-Key" # Key Change
Step 2 Test it
In this request, litellm will use the Virtual key in the X-Litellm-Key header
- curl
- OpenAI Python SDK
curl http://localhost:4000/v1/chat/completions \
  -H "Content-Type: application/json" \
  -H "X-Litellm-Key: Bearer $LITELLM_API_KEY" \
  -H "Authorization: Bearer bad-key" \
  -d '{
    "model": "fake-openai-endpoint",
    "messages": [
      {"role": "user", "content": "Hello, Claude gm!"}
    ]
  }'
Expected Response
Expect to see a successful response from the litellm proxy since the key passed in X-Litellm-Key is valid
{"id":"chatcmpl-f9b2b79a7c30477ab93cd0e717d1773e","choices":[{"finish_reason":"stop","index":0,"message":{"content":"\n\nHello there, how may I assist you today?","role":"assistant","tool_calls":null,"function_call":null}}],"created":1677652288,"model":"gpt-5.6-luna","object":"chat.completion","system_fingerprint":"fp_44709d6fcb","usage":{"completion_tokens":12,"prompt_tokens":9,"total_tokens":21}
client = openai.OpenAI(
    api_key="not-used",
    base_url="https://api-gateway-url.com/llmservc/api/litellmp",
    default_headers={
        "Authorization": f"Bearer {API_GATEWAY_TOKEN}", # (optional) For your API Gateway
        "X-Litellm-Key": f"Bearer sk-<your-litellm-api-key>"              # For LiteLLM Proxy
    }
)
Overwrite outgoing user with the key hash
Available in v1.95.0 and later.
Many providers use the request's end-user identifier (the user field) to monitor and detect abuse and to trace activity back to an individual end user, so that one user's misuse is less likely to disrupt access for your whole organization. Because that field is set by the caller, a client can change it to dissociate its activity from a given identity. Turn on overwrite_user_with_key_hash when you want the user the provider sees to be a stable, tamper-proof identifier tied to the LiteLLM key that made the call, so any provider-side handling keyed on user maps back to exactly one key no matter what the client sent.
When enabled, the proxy force-sets the outgoing user on chat/completions requests to the calling key's identity, always overriding any user in the request body and setting it even when the client omits user. For a virtual key the value is the key's sha256 token hash, which is the same value stored as user_api_key_hash in spend logs, so you can map the provider-visible id back to a key and its owner without any extra plumbing. For requests authenticated with the master key the value is the fixed alias litellm_proxy_master_key, so neither the master key nor its hash is ever forwarded.
The flag is off by default and only affects keys the proxy itself validated (virtual keys and the master key). It behaves the same regardless of whether a virtual key has a user or sits under a team; the stamp is always the key hash. Requests authenticated by a custom auth handler or a JWT are left untouched, and with the flag off the caller-supplied user is preserved, so existing behavior does not change.
litellm_settings:
  overwrite_user_with_key_hash: true
A request that supplies its own user has it replaced before the call is dispatched:
curl http://localhost:4000/v1/chat/completions \
  -H "Content-Type: application/json" \
  -H "Authorization: Bearer sk-your-virtual-key" \
  -d '{
    "model": "gpt-5.6-terra",
    "messages": [{"role": "user", "content": "hi"}],
    "user": "anything-the-client-sends"
  }'
The provider receives user set to the key's sha256 hash (e.g. 98e983...6401) rather than anything-the-client-sends.
Whether the user value reaches the provider on the wire is each provider's existing behavior, which this setting does not change. Some providers forward user as-is, some map it onto their own end-user field, and some drop it; this flag only controls the value LiteLLM sets, not whether a given provider transmits it.
Enable/Disable Virtual Keys
Disable Keys
curl -L -X POST 'http://0.0.0.0:4000/key/block' \
-H 'Authorization: Bearer LITELLM_MASTER_KEY' \
-H 'Content-Type: application/json' \
-d '{"key": "KEY-TO-BLOCK"}'
Expected Response:
{
  ...
  "blocked": true
}
Enable Keys
curl -L -X POST 'http://0.0.0.0:4000/key/unblock' \
-H 'Authorization: Bearer LITELLM_MASTER_KEY' \
-H 'Content-Type: application/json' \
-d '{"key": "KEY-TO-UNBLOCK"}'
{
  ...
  "blocked": false
}
Custom /key/generate
If you need to add custom logic before generating a Proxy API Key (Example Validating team_id)
1. Write a custom custom_generate_key_fn
The input to the custom_generate_key_fn function is a single parameter: data (Type: GenerateKeyRequest)
The output of your custom_generate_key_fn should be a dictionary with the following structure
{
    "decision": False,
    "message": "This violates LiteLLM Proxy Rules. No team id provided.",
}
-
decision (Type: bool): A boolean value indicating whether the key generation is allowed (True) or not (False).
-
message (Type: str, Optional): An optional message providing additional information about the decision. This field is included when the decision is False.
async def custom_generate_key_fn(data: GenerateKeyRequest)-> dict:
        """
        Asynchronous function for generating a key based on the input data.

        Args:
            data (GenerateKeyRequest): The input data for key generation.

        Returns:
            dict: A dictionary containing the decision and an optional message.
            {
                "decision": False,
                "message": "This violates LiteLLM Proxy Rules. No team id provided.",
            }
        """

        # decide if a key should be generated or not
        print("using custom auth function!")
        data_json = data.json()  # type: ignore

        # Unpacking variables
        team_id = data_json.get("team_id")
        duration = data_json.get("duration")
        models = data_json.get("models")
        aliases = data_json.get("aliases")
        config = data_json.get("config")
        spend = data_json.get("spend")
        user_id = data_json.get("user_id")
        max_parallel_requests = data_json.get("max_parallel_requests")
        metadata = data_json.get("metadata")
        tpm_limit = data_json.get("tpm_limit")
        rpm_limit = data_json.get("rpm_limit")

        if team_id is not None and team_id == "litellm-core-infra@gmail.com":
            # only team_id="litellm-core-infra@gmail.com" can make keys
            return {
                "decision": True,
            }
        else:
            print("Failed custom auth")
            return {
                "decision": False,
                "message": "This violates LiteLLM Proxy Rules. No team id provided.",
            }
2. Pass the filepath (relative to the config.yaml)
Pass the filepath to the config.yaml
e.g. if they're both in the same dir - ./config.yaml and ./custom_auth.py, this is what it looks like:
model_list:
  - model_name: "openai-model"
    litellm_params:
      model: "gpt-5.6-luna"

litellm_settings:
  drop_params: True
  set_verbose: True

general_settings:
  custom_key_generate: custom_auth.custom_generate_key_fn
custom_key_generate only runs on /key/generate. Key edits (/key/update, /key/bulk_update, /team/key/bulk_update, and editing a key in the Admin UI, which calls /key/update) skip it, so a user can create a compliant key and then edit it out of compliance, e.g. remove its expiration date. Set custom_key_update as well if your policy should also hold on edits, or use custom_key_policy, the recommended single hook that runs on every key operation, regenerate included.
Custom /key/update
If you enforce a policy with custom_key_generate, set custom_key_update to keep enforcing it when keys are edited. It runs on /key/update, /key/bulk_update, and /team/key/bulk_update. The Admin UI edit key flow calls /key/update, so this also covers edits made from the UI. For one hook that covers generate, update, and regenerate against the merged key state, see custom_key_policy.
1. Write a custom custom_update_key_fn
The input to the custom_update_key_fn function is a single parameter: data (Type: UpdateKeyRequest)
The output contract is the same as custom_generate_key_fn: return {"decision": True} to allow the update, or {"decision": False, "message": "..."} to reject it. Rejected updates fail with a 403.
Update requests only contain the fields being changed, so an unset field means "leave as is", not "clear". Use data.model_fields_set to tell an omitted field apart from one explicitly set to None. For example, the Admin UI sends duration: null when a key is edited to "Never expires", which the function below rejects.
from litellm.proxy._types import UpdateKeyRequest


async def custom_update_key_fn(data: UpdateKeyRequest) -> dict:
    """
    Asynchronous function that decides if a key update should be allowed.

    Args:
        data (UpdateKeyRequest): The requested changes to the key.

    Returns:
        dict: A dictionary containing the decision and an optional message.
    """
    if "duration" in data.model_fields_set and data.duration is None:
        return {
            "decision": False,
            "message": "This violates LiteLLM Proxy Rules. Keys must keep an expiration date.",
        }
    return {"decision": True}
2. Pass the filepath (relative to the config.yaml)
general_settings:
  custom_key_generate: custom_auth.custom_generate_key_fn
  custom_key_update: custom_auth.custom_update_key_fn
Custom key policy (one hook for every key operation)
custom_key_generate and custom_key_update each see only the raw request of their own endpoint, so a rule like "every key expires within seven days" has to be written twice, and neither hook sees the key it is changing or the absolute expiry a relative duration turns into. custom_key_policy is one hook that runs on every key operation and receives the operation plus the effective key state: the existing key merged with the requested changes, with a relative duration already turned into an absolute expires. Write the rule once and it holds whichever endpoint or Admin UI action changes the key.
1. Write a custom custom_key_policy_fn
The input is a single parameter, policy_request. policy_request.operation is one of "generate", "update", or "regenerate". policy_request.existing_key is the key row as stored today, None on generate. policy_request.effective_key is the row as it will be written after the operation: existing values overlaid with the requested changes, duration turned into expires, budget_duration into budget_reset_at, organization_id into org_id, and metadata-style request fields such as tags and guardrails folded into metadata. policy_request.request is the request body as received, the same object the legacy hooks get, for a rule that wants the relative duration string.
The output contract is the same as custom_generate_key_fn: return {"decision": True} to allow the operation, or {"decision": False, "message": "..."} to deny it. Denied operations fail with a 403 carrying the message.
This policy caps every key at seven days from now. effective_key.expires is an absolute UTC datetime, or None for a key that never expires, so the same check holds for a fresh key, an edit that extends duration, and a regenerate.
from datetime import datetime, timedelta, timezone

MAX_KEY_LIFETIME = timedelta(days=7)


async def custom_key_policy_fn(policy_request) -> dict:
    expires = policy_request.effective_key.expires
    if expires is None or expires > datetime.now(timezone.utc) + MAX_KEY_LIFETIME:
        return {
            "decision": False,
            "message": f"This violates LiteLLM Proxy Rules. Keys must expire within {MAX_KEY_LIFETIME.days} days.",
        }
    return {"decision": True}
2. Pass the filepath (relative to the config.yaml)
general_settings:
  custom_key_policy: custom_auth.custom_key_policy_fn
The hook runs on /key/generate, /key/service-account/generate, /key/update, /key/bulk_update, /team/key/bulk_update, and /key/{key}/regenerate, which covers the Admin UI create, edit, and regenerate key flows. It runs after the request is validated and, on generate, after default_key_generate_params and upperbound_key_generate_params are applied, right before the key is written, so effective_key is what the database would hold if the policy allows the operation.
custom_key_generate and custom_key_update keep working unchanged. When they are configured alongside custom_key_policy, they run first on the raw request and each can deny on its own; the policy then runs on the effective key state. All three can be set at once:
general_settings:
  custom_key_generate: custom_auth.custom_generate_key_fn
  custom_key_update: custom_auth.custom_update_key_fn
  custom_key_policy: custom_auth.custom_key_policy_fn
Enforce a key_alias naming pattern
Set litellm_settings.key_alias_pattern to a regex and every key_alias sent to /key/generate, /key/service-account/generate, /key/update, and /key/{key}/regenerate has to match it, which covers the Admin UI create, edit, and regenerate key flows. The whole alias has to match (Python re.fullmatch), so team-[a-z]+ accepts team-search and rejects team-search-2. Aliases are capped at 255 characters before the pattern runs, so a pattern that backtracks badly never sees an unbounded alias
litellm_settings:
  key_alias_pattern: "^[a-z0-9]+(-[a-z0-9]+)*$"
A request whose alias does not match fails with a 400 that names the pattern:
curl -X POST 'http://0.0.0.0:4000/key/generate' \
  -H "Authorization: Bearer $LITELLM_MASTER_KEY" \
  -H 'Content-Type: application/json' \
  -d '{"key_alias": "Prod Key"}'
{"error": {"message": "Invalid key_alias format. Must be at most 255 characters and match the configured key_alias_pattern: ^[a-z0-9]+(-[a-z0-9]+)*$", "type": "bad_request_error", "param": "key_alias", "code": "400"}}
key_alias_pattern replaces the built-in rule that enable_key_alias_format_validation turns on, so set one or the other. An update or regenerate that leaves key_alias unchanged is not checked, so keys named before the pattern was configured can still be edited, and the pattern applies the moment the alias changes. Path traversal and control characters in an alias are rejected whatever the pattern allows. A pattern that does not compile fails proxy startup with Invalid regex set for litellm_settings.key_alias_pattern
Upperbound /key/generate params
Use this, if you need to set default upperbounds for max_budget, budget_duration or any key/generate param per key.
Set litellm_settings:upperbound_key_generate_params:
litellm_settings:
  upperbound_key_generate_params:
    max_budget: 100 # Optional[float], optional): upperbound of $100, for all /key/generate requests
    budget_duration: "10d" # Optional[str], optional): upperbound of 10 days for budget_duration values
    duration: "30d" # Optional[str], optional): upperbound of 30 days for all /key/generate requests
    max_parallel_requests: 1000 # (Optional[int], optional): Max number of requests that can be made in parallel. Defaults to None.
    tpm_limit: 1000 #(Optional[int], optional): Tpm limit. Defaults to None.
    rpm_limit: 1000 #(Optional[int], optional): Rpm limit. Defaults to None.
** Expected Behavior **
- Send a
/key/generaterequest withmax_budget=200 - The request is rejected with HTTP 400:
max_budget is over max limit set in config - user_value=200; max_value=100. Values above the upper bound are not clamped. The same applies tomax_parallel_requests,tpm_limit,rpm_limit, and toduration/budget_durationlonger than the configured bound - Omit
budget_duration, or send it asnull: the key is created withbudget_duration="10d". Upperbounds also act as defaults and cannot be opted out of
Default /key/generate params
Use this, if you need to control the default max_budget or any key/generate param per key.
When a /key/generate request does not specify max_budget, it will use the max_budget specified in default_key_generate_params. These defaults fill any field that is missing or null in the request. budget_duration is the one exception: sending an explicit "budget_duration": null creates a key whose budget never resets, skipping the configured default (upperbound_key_generate_params still applies).
Set litellm_settings:default_key_generate_params:
litellm_settings:
  default_key_generate_params:
    max_budget: 1.5000
    models: ["azure-gpt-3.5"]
    duration:     # blank means `null`
    metadata: {"setting":"default"}
    team_id: "core-infra"
Key Rotations
This feature requires a LiteLLM Enterprise license. Start a free 30-day trial or book a demo. See what Enterprise includes.
Rotate an existing API Key, while optionally updating its parameters.
curl 'http://localhost:4000/key/sk-<virtual-key>/regenerate' \
  -X POST \
  -H "Authorization: Bearer $LITELLM_API_KEY" \
  -H 'Content-Type: application/json' \
  -d '{
    "max_budget": 100,
    "metadata": {
      "team": "core-infra"
    },
    "models": [
      "gpt-5.6-terra",
      "gpt-5.6-luna"
    ],
    "grace_period": "48h"
  }'
Grace period (optional): Set grace_period (e.g. "24h", "2d", "1w") to keep the old key valid for a transitional period. Both old and new keys work until the grace period elapses, so you can cut over without production downtime. Omitted or empty = immediate revoke. Can also be set via LITELLM_KEY_ROTATION_GRACE_PERIOD env var for scheduled rotations.
Read More
Scheduled Key Rotations
LiteLLM can rotate virtual keys automatically based on time intervals you define.
Prerequisites
- Database connection required - Key rotation requires a connected database to track rotation schedules
- Enable the rotation worker - Set environment variable
LITELLM_KEY_ROTATION_ENABLED=true - Configure check interval - Optionally set
LITELLM_KEY_ROTATION_CHECK_INTERVAL_SECONDS(default: 86400 seconds / 24 hours)
How it works
- When creating a virtual key, set
auto_rotate: trueandrotation_interval(duration string) - LiteLLM calculates the next rotation time as
now + rotation_intervaland stores it in the database - A background job periodically checks for keys where the rotation time has passed
- When a key is due for rotation, LiteLLM automatically regenerates it and invalidates the old key string
- The new rotation time is calculated and the cycle continues
Create a key with auto rotation
API
curl 'http://0.0.0.0:4000/key/generate' \
  -H 'Authorization: Bearer <your-master-key>' \
  -H 'Content-Type: application/json' \
  -d '{
        "models": ["gpt-5.6-terra"],
        "auto_rotate": true,
        "rotation_interval": "30d"
      }'
LiteLLM UI
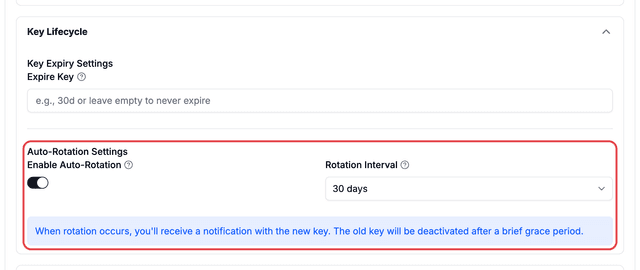
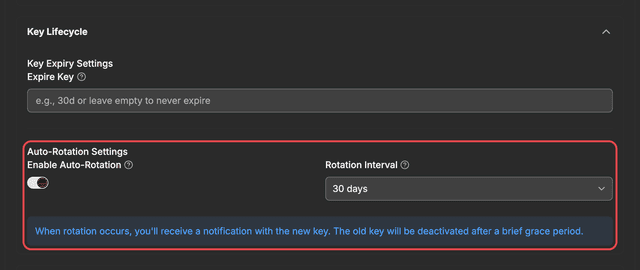
On the LiteLLM UI, Navigate to the Keys page and click on Create New Key > Optional Settings > Key Lifecycle > Auto-Rotation Settings > Enable Auto-Rotation
Valid rotation_interval formats:
"30s"- 30 seconds"30m"- 30 minutes"30h"- 30 hours"30d"- 30 days"90d"- 90 days
Update existing key to enable rotation
API
curl 'http://0.0.0.0:4000/key/update' \
  -H 'Authorization: Bearer <your-master-key>' \
  -H 'Content-Type: application/json' \
  -d '{
        "key": "sk-existing-key",
        "auto_rotate": true,
        "rotation_interval": "90d"
      }'
LiteLLM UI
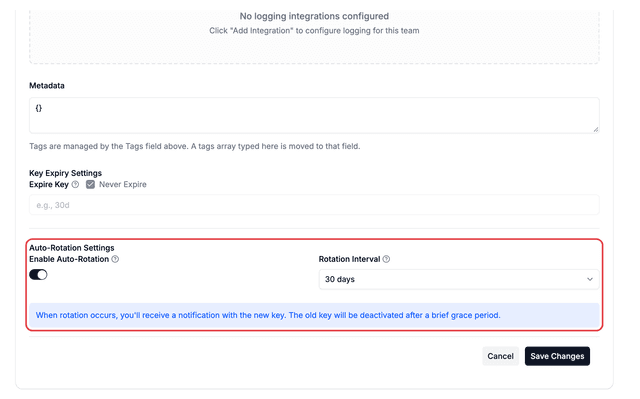
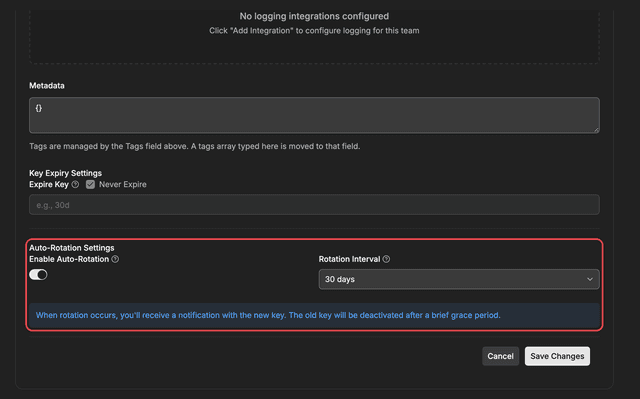
On the LiteLLM UI, Navigate to the Keys page. Select the key you want to update and click on Edit Settings > Auto-Rotation Settings
Environment variables
Set these environment variables when starting the proxy:
| Variable | Description | Default |
|---|---|---|
LITELLM_KEY_ROTATION_ENABLED | Enable the rotation worker | false |
LITELLM_KEY_ROTATION_CHECK_INTERVAL_SECONDS | How often to scan for keys to rotate (in seconds) | 86400 (24 hours) |
LITELLM_KEY_ROTATION_GRACE_PERIOD | Duration to keep old key valid after rotation (e.g. 24h, 2d) | "" (immediate revoke) |
Example:
export LITELLM_KEY_ROTATION_ENABLED=true
export LITELLM_KEY_ROTATION_CHECK_INTERVAL_SECONDS=3600  # Check every hour
export LITELLM_KEY_ROTATION_GRACE_PERIOD=48h  # Keep old key valid for 48h during cutover

litellm --config config.yaml
Temporary Budget Increase
Use the /key/update endpoint to increase the budget of an existing key. temp_budget_expiry is a datetime, not a duration string, so pass an ISO date such as 2026-10-15. See Temporary Budget Increase for details.
curl -L -X POST 'http://localhost:4000/key/update' \
-H "Authorization: Bearer $LITELLM_API_KEY" \
-H 'Content-Type: application/json' \
-d '{"key": "sk-b3Z3Lqdb_detHXSUp4ol4Q", "temp_budget_increase": 100, "temp_budget_expiry": "2026-10-15"}'
Restricting Key Generation
Use this to control who can generate keys. Useful when letting others create keys on the UI.
litellm_settings:
  key_generation_settings:
    team_key_generation:
      allowed_team_member_roles: ["admin"]
      required_params: ["tags"] # require team admins to set tags for cost-tracking when generating a team key
    personal_key_generation: # maps to 'Default Team' on UI
      allowed_user_roles: ["proxy_admin"]
Spec
key_generation_settings: Optional[StandardKeyGenerationConfig] = None
Types
class StandardKeyGenerationConfig(TypedDict, total=False):
    team_key_generation: TeamUIKeyGenerationConfig
    personal_key_generation: PersonalUIKeyGenerationConfig

class TeamUIKeyGenerationConfig(TypedDict):
    allowed_team_member_roles: List[str] # either 'user' or 'admin'
    required_params: List[str] # require params on `/key/generate` to be set if a team key (team_id in request) is being generated


class PersonalUIKeyGenerationConfig(TypedDict):
    allowed_user_roles: List[LitellmUserRoles]
    required_params: List[str] # require params on `/key/generate` to be set if a personal key (no team_id in request) is being generated


class LitellmUserRoles(str, enum.Enum):
    """
    Admin Roles:
    PROXY_ADMIN: admin over the platform
    PROXY_ADMIN_VIEW_ONLY: can login, view all own keys, view all spend
    ORG_ADMIN: admin over a specific organization, can create teams, users only within their organization

    Internal User Roles:
    INTERNAL_USER: can login, view/create/delete their own keys, view their spend
    INTERNAL_USER_VIEW_ONLY: can login, view their own keys, view their own spend


    Team Roles:
    TEAM: used for JWT auth


    Customer Roles:
    CUSTOMER: External users -> these are customers

    """

    # Admin Roles
    PROXY_ADMIN = "proxy_admin"
    PROXY_ADMIN_VIEW_ONLY = "proxy_admin_viewer"

    # Organization admins
    ORG_ADMIN = "org_admin"

    # Internal User Roles
    INTERNAL_USER = "internal_user"
    INTERNAL_USER_VIEW_ONLY = "internal_user_viewer"

    # Team Roles
    TEAM = "team"

    # Customer Roles - External users of proxy
    CUSTOMER = "customer"
Next Steps - Set Budgets, Rate Limits per Virtual Key
Follow this doc to set budgets, rate limiters per virtual key with LiteLLM

