Open WebUI
This guide walks you through connecting Open WebUI to LiteLLM. Using LiteLLM with Open WebUI allows teams to
- Access 100+ LLMs on Open WebUI
- Track Spend / Usage, Set Budget Limits
- Send Request/Response Logs to logging destinations like langfuse, s3, gcs buckets, etc.
- Set access controls eg. Control what models Open WebUI can access.
Quickstart
- Make sure to setup LiteLLM with the LiteLLM Quickstart
1. Start LiteLLM & Open WebUI
- Open WebUI starts running on http://localhost:3000
- LiteLLM starts running on http://localhost:4000
2. Create a Virtual Key on LiteLLM
Virtual Keys are API Keys that allow you to authenticate to LiteLLM Proxy. We will create a Virtual Key that will allow Open WebUI to access LiteLLM.
2.1 LiteLLM User Management Hierarchy
On LiteLLM, you can create Organizations, Teams, Users and Virtual Keys. For this tutorial, we will create a Team and a Virtual Key.
Organization- An Organization is a group of Teams. (US Engineering, EU Developer Tools)Team- A Team is a group of Users. (Open WebUI Team, Data Science Team, etc.)User- A User is an individual user (employee, developer, eg.krrish@litellm.ai)Virtual Key- A Virtual Key is an API Key that allows you to authenticate to LiteLLM Proxy. A Virtual Key is associated with a User or Team.
Once the Team is created, you can invite Users to the Team. You can read more about LiteLLM's User Management here.
2.2 Create a Team on LiteLLM
Navigate to http://localhost:4000/ui and create a new team.
2.2 Create a Virtual Key on LiteLLM
Navigate to http://localhost:4000/ui and create a new virtual Key.
LiteLLM allows you to specify what models are available on Open WebUI (by specifying the models the key will have access to).

3. Connect Open WebUI to LiteLLM
On Open WebUI, navigate to Settings -> Connections and create a new connection to LiteLLM
Enter the following details:
- URL:
http://localhost:4000(your litellm proxy base url) - Key:
your-virtual-key(the key you created in the previous step)
3.1 Test Request
On the top left corner, select models you should only see the models you gave the key access to in Step 2.
Once you selected a model, enter your message content and click on Submit
3.2 Tracking Usage & Spend
Basic Tracking
After making requests, navigate to the Logs section in the LiteLLM UI to view Model, Usage and Cost information.
Per-User Tracking
To track spend and usage for each Open WebUI user, configure both Open WebUI and LiteLLM:
- Enable User Info Headers in Open WebUI
Set the following environment variable for Open WebUI to enable user information in request headers:
ENABLE_FORWARD_USER_INFO_HEADERS=True
For more details, see the Environment Variable Configuration Guide.
- Configure LiteLLM to Parse User Headers
Add the following to your LiteLLM config.yaml to specify the request header mapping for user tracking:
general_settings:
  user_header_mappings:
    - header_name: X-OpenWebUI-User-Id
      litellm_user_role: internal_user
    - header_name: X-OpenWebUI-User-Email
      litellm_user_role: customer
ⓘ Available tracking options
You can use any of the following headers in header_name in user_header_mappings :
X-OpenWebUI-User-IdX-OpenWebUI-User-EmailX-OpenWebUI-User-Name
These may offer better readability and easier mental attribution when hosting for a small group of users that you know well.
Choose based on your needs, but note that in Open WebUI:
- Users can modify their own usernames
- Administrators can modify both usernames and emails of any account
This video walks through on how we can map the openweb ui headers to LiteLLM user roles
Render thinking content on Open WebUI
Open WebUI requires reasoning/thinking content to be rendered with <think></think> tags. In order to render this for specific models, you can use the merge_reasoning_content_in_choices litellm parameter.
Example litellm config.yaml:
model_list:
  - model_name: thinking-anthropic-claude-3-7-sonnet # Bedrock Anthropic
    litellm_params:
      model: bedrock/us.anthropic.claude-3-7-sonnet-20250219-v1:0
      thinking: {"type": "enabled", "budget_tokens": 1024}
      max_tokens: 1080
      merge_reasoning_content_in_choices: true
  - model_name: vertex_ai/gemini-2.5-pro # Vertex AI Gemini
    litellm_params:
      model: vertex_ai/gemini-2.5-pro
      thinking: {"type": "enabled", "budget_tokens": 1024}
      merge_reasoning_content_in_choices: true
Test it on Open WebUI
On the models dropdown select thinking-anthropic-claude-3-7-sonnet

Additional Resources
- Running LiteLLM and Open WebUI on Windows Localhost: A Comprehensive Guide https://www.tanyongsheng.com/note/running-litellm-and-openwebui-on-windows-localhost-a-comprehensive-guide/
- Run Guardrails Based on User-Agent Header
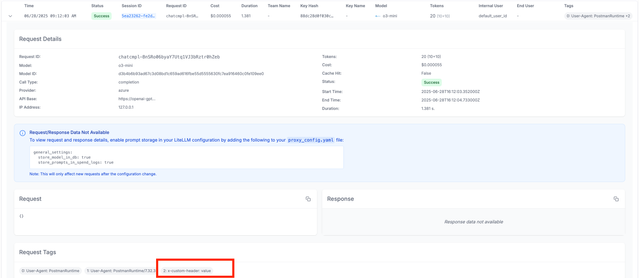
Add Custom Headers to Spend Tracking
You can add custom headers to the request to track spend and usage.
litellm_settings:
  extra_spend_tag_headers:
    - "x-custom-header"
You can add custom headers to the request to track spend and usage.