PII Masking - LiteLLM Gateway (Deprecated Version)
This is deprecated, please use our new Presidio pii masking integration
LiteLLM supports Microsoft Presidio for PII masking.
Quick Start
Step 1. Add env
export PRESIDIO_ANALYZER_API_BASE="http://localhost:5002"
export PRESIDIO_ANONYMIZER_API_BASE="http://localhost:5001"
Step 2. Set it as a callback in config.yaml
litellm_settings:
    callbacks = ["presidio", ...] # e.g. ["presidio", custom_callbacks.proxy_handler_instance]
Step 3. Start proxy
litellm --config /path/to/config.yaml
This will mask the input going to the llm provider
Output parsing
LLM responses can sometimes contain the masked tokens.
For presidio 'replace' operations, LiteLLM can check the LLM response and replace the masked token with the user-submitted values.
Just set litellm.output_parse_pii = True, to enable this.
litellm_settings:
    output_parse_pii: true
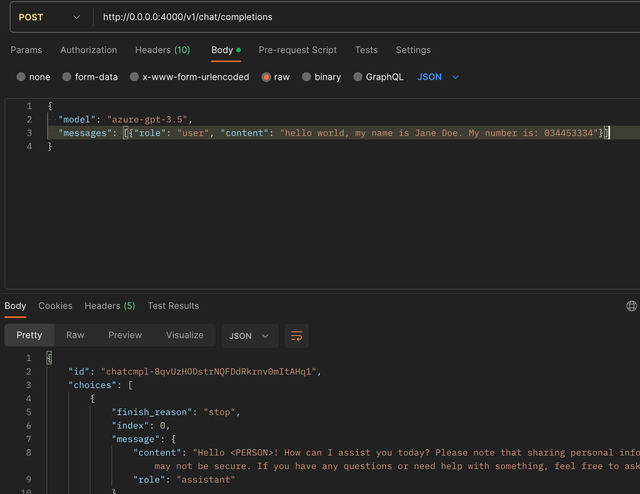
Expected Flow:
User Input: "hello world, my name is Jane Doe. My number is: 034453334"
LLM Input: "hello world, my name is [PERSON]. My number is: [PHONE_NUMBER]"
LLM Response: "Hey [PERSON], nice to meet you!"
User Response: "Hey Jane Doe, nice to meet you!"
Ad-hoc recognizers
Send ad-hoc recognizers to presidio /analyze by passing a json file to the proxy
litellm_settings:
  callbacks: ["presidio"]
  presidio_ad_hoc_recognizers: "./hooks/example_presidio_ad_hoc_recognizer.json"
You can see this working, when you run the proxy:
litellm --config /path/to/config.yaml --debug
Make a chat completions request, example:
{
  "model": "azure-gpt-3.5",
  "messages": [{"role": "user", "content": "John Smith AHV number is 756.3026.0705.92. Zip code: 1334023"}]
}
And search for any log starting with Presidio PII Masking, example:
Presidio PII Masking: Redacted pii message: <PERSON> AHV number is <AHV_NUMBER>. Zip code: <US_DRIVER_LICENSE>
Turn on/off per key
Turn off PII masking for a given key.
Do this by setting permissions: {"pii": false}, when generating a key.
curl --location 'http://0.0.0.0:4000/key/generate' \
--header 'Authorization: Bearer sk-1234' \
--header 'Content-Type: application/json' \
--data '{
    "permissions": {"pii": false}
}'
Turn on/off per request
The proxy support 2 request-level PII controls:
- no-pii: Optional(bool) - Allow user to turn off pii masking per request.
- output_parse_pii: Optional(bool) - Allow user to turn off pii output parsing per request.
Usage
Step 1. Create key with pii permissions
Set allow_pii_controls to true for a given key. This will allow the user to set request-level PII controls.
curl --location 'http://0.0.0.0:4000/key/generate' \
--header 'Authorization: Bearer my-master-key' \
--header 'Content-Type: application/json' \
--data '{
    "permissions": {"allow_pii_controls": true}
}'
Step 2. Turn off pii output parsing
import os
from openai import OpenAI

client = OpenAI(
    # This is the default and can be omitted
    api_key=os.environ.get("OPENAI_API_KEY"),
        base_url="http://0.0.0.0:4000"
)

chat_completion = client.chat.completions.create(
    messages=[
        {
            "role": "user",
            "content": "My name is Jane Doe, my number is 8382043839",
        }
    ],
    model="gpt-3.5-turbo",
    extra_body={
        "content_safety": {"output_parse_pii": False}
    }
)
Step 3: See response
{
  "id": "chatcmpl-8c5qbGTILZa1S4CK3b31yj5N40hFN",
  "choices": [
    {
      "finish_reason": "stop",
      "index": 0,
      "message": {
        "content": "Hi [PERSON], what can I help you with?",
        "role": "assistant"
      }
    }
  ],
  "created": 1704089632,
  "model": "gpt-35-turbo",
  "object": "chat.completion",
  "system_fingerprint": null,
  "usage": {
    "completion_tokens": 47,
    "prompt_tokens": 12,
    "total_tokens": 59
  },
  "_response_ms": 1753.426
}
Turn on for logging only
Only apply PII Masking before logging to Langfuse, etc.
Not on the actual llm api request / response.
This is currently only applied for
/chat/completionrequests- on 'success' logging
- Setup config.yaml
litellm_settings:
  presidio_logging_only: true

model_list:
  - model_name: gpt-3.5-turbo
    litellm_params:
      model: gpt-3.5-turbo
      api_key: os.environ/OPENAI_API_KEY
- Start proxy
litellm --config /path/to/config.yaml
- Test it!
curl -X POST 'http://0.0.0.0:4000/chat/completions' \
-H 'Content-Type: application/json' \
-H 'Authorization: Bearer sk-1234' \
-D '{
  "model": "gpt-3.5-turbo",
  "messages": [
    {
      "role": "user",
      "content": "Hi, my name is Jane!"
    }
  ]
  }'
Expected Logged Response
Hi, my name is <PERSON>!