MCP Permission Management
Control which MCP servers and tools can be accessed by specific keys, teams, or organizations in LiteLLM. When a client attempts to list or call tools, LiteLLM enforces access controls based on configured permissions.
Overview
LiteLLM provides fine-grained permission management for MCP servers, allowing you to:
- Restrict MCP access by entity: Control which keys, teams, or organizations can access specific MCP servers
- Tool-level filtering: Automatically filter available tools based on entity permissions
- Centralized control: Manage all MCP permissions from the LiteLLM Admin UI or API
- One-click public MCPs: Mark specific servers as available to every LiteLLM API key when you don't need per-key restrictions
This ensures that only authorized entities can discover and use MCP tools, providing an additional security layer for your MCP infrastructure.
- MCP Overview - Learn about MCP in LiteLLM
- MCP Cost Tracking - Track costs for MCP tool calls
- MCP Guardrails - Apply security guardrails to MCP calls
- Using MCP - How to use MCP with LiteLLM
How It Works
LiteLLM supports managing permissions for MCP Servers by Keys, Teams, Organizations (entities) on LiteLLM. When a MCP client attempts to list tools, LiteLLM will only return the tools the entity has permissions to access.
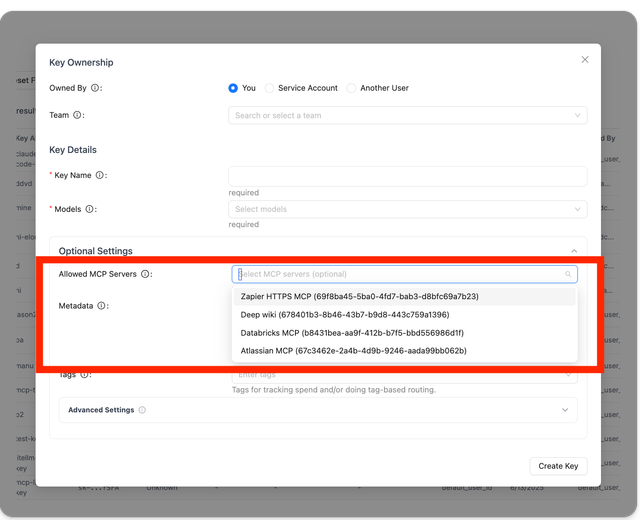
When Creating a Key, Team, or Organization, you can select the allowed MCP Servers that the entity has access to.
Permission Hierarchy
Permissions can be set at five distinct levels. When more than one level applies to a request, LiteLLM intersects the lists (most-restrictive wins) — except for the organization level, which acts as a ceiling.
| Level | Source | How it composes |
|---|---|---|
| Key | object_permission.mcp_servers / object_permission.mcp_access_groups on the virtual key | If the key has an explicit list, it's used. |
| Team | Same fields on the team | If both key and team have lists, the result is the intersection (only servers in both). If only the team has a list, the key inherits it. |
| End user | Same fields on the LiteLLM_EndUserTable row matching x-litellm-end-user-id | Intersected with the running result. Skipped if no end-user-id is present on the request. |
| Agent | Same fields on the agent identified by x-litellm-agent-id | Intersected with the running result. Skipped if no agent-id is present. |
| Organization | Same fields on the org owning the key/team | Acts as a ceiling — the final allowed-server set is intersected with the org's list. If the org has no list, no additional restriction. |
If no level has a list, the request can access every MCP server (open by default).
The same intersection model applies to the per-server tool-level dict mcp_tool_permissions (see Per-entity Tool-Level Permissions below).
Require keys to define their own MCP access
By default a key with an empty or absent mcp_servers list inherits its team's list, so the team is effectively a default that every key falls back to. Set require_key_mcp_access_defined: true under general_settings to flip that relationship: the team becomes a ceiling rather than a default, and a key with an empty list is granted no MCP servers unless it grants some explicitly (either directly in object_permission.mcp_servers or via an access group).
general_settings:
  require_key_mcp_access_defined: true
A team with an empty mcp_servers list still means "no restriction" regardless of this flag, since an empty team list never restricts. The flag only changes what an empty key list means when the team does have a list: inherit it (default) versus grant nothing (flag on). Access-group grants on the key remain additive, so attaching a group still reaches its servers even when the flag is enabled.
For the equivalent control at the end-user level, see require_end_user_mcp_access_defined.
Opting a key out of all MCP servers (no-mcp-servers)
To explicitly deny a key every MCP server, put the sentinel no-mcp-servers in its mcp_servers list. This mirrors the no-default-models sentinel used for model access. Unlike an empty list, which inherits the team's servers, no-mcp-servers overrides team inheritance and any additive access-group grants, so the key resolves to zero MCP servers no matter what its team allows.
curl -X POST "http://localhost:4000/key/generate" \
  -H "Authorization: Bearer sk-master-key" \
  -H "Content-Type: application/json" \
  -d '{
    "object_permission": {
      "mcp_servers": ["no-mcp-servers"]
    }
  }'
Allow/Disallow MCP Tools
Control which tools are available from your MCP servers. You can either allow only specific tools or block dangerous ones.
- Only Allow Specific Tools
- Block Specific Tools
Use allowed_tools to specify exactly which tools users can access. All other tools will be blocked.
mcp_servers:
  github_mcp:
    url: "https://api.githubcopilot.com/mcp"
    auth_type: oauth2
    oauth2_flow: authorization_code
    authorization_url: https://github.com/login/oauth/authorize
    token_url: https://github.com/login/oauth/access_token
    client_id: os.environ/GITHUB_OAUTH_CLIENT_ID
    client_secret: os.environ/GITHUB_OAUTH_CLIENT_SECRET
    scopes: ["public_repo", "user:email"]
    allowed_tools: ["list_tools"]
    # only list_tools will be available
Use this when:
- You want strict control over which tools are available
- You're in a high-security environment
- You're testing a new MCP server with limited tools
Use disallowed_tools to block specific tools. All other tools will be available.
mcp_servers:
  github_mcp:
    url: "https://api.githubcopilot.com/mcp"
    auth_type: oauth2
    oauth2_flow: authorization_code
    authorization_url: https://github.com/login/oauth/authorize
    token_url: https://github.com/login/oauth/access_token
    client_id: os.environ/GITHUB_OAUTH_CLIENT_ID
    client_secret: os.environ/GITHUB_OAUTH_CLIENT_SECRET
    scopes: ["public_repo", "user:email"]
    disallowed_tools: ["repo_delete"]
    # only repo_delete will be blocked
Use this when:
- Most tools are safe, but you want to block a few dangerous ones
- You want to prevent expensive API calls
- You're gradually adding restrictions to an existing server
Important Notes
- If you specify both
allowed_toolsanddisallowed_tools, the allowed list takes priority - Tool names are case-sensitive
Public MCP Servers (allow_all_keys)
Some MCP servers are meant to be shared broadly—think internal knowledge bases, calendar integrations, or other low-risk utilities where every team should be able to connect without requesting access. Instead of adding those servers to every key, team, or organization, enable the new allow_all_keys toggle.
- UI
- config.yaml
- Open MCP Servers → Add / Edit in the Admin UI.
- Expand Permission Management / Access Control.
- Toggle Allow All LiteLLM Keys on.
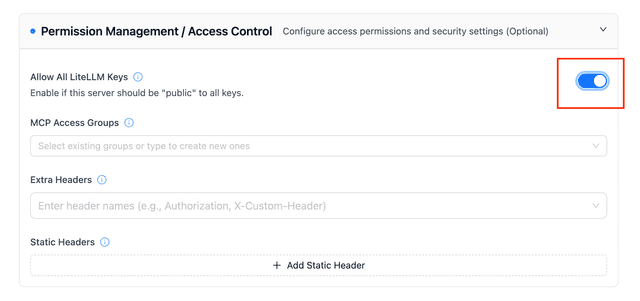
The toggle makes the server “public” without touching existing access groups.
Set allow_all_keys: true to mark the server as public:
mcp_servers:
  deepwiki:
    url: https://mcp.deepwiki.com/mcp
    allow_all_keys: true
When to use it
- You have shared MCP utilities where fine-grained ACLs would only add busywork.
- You want a “default enabled” experience for internal users, while still being able to layer tool-level restrictions.
- You’re onboarding new teams and want the safest MCPs available out of the box.
Once enabled, LiteLLM automatically includes the server for every key during tool discovery/calls—no extra virtual-key or team configuration is required.
Allow/Disallow MCP Tool Parameters
Control which parameters are allowed for specific MCP tools using the allowed_params configuration. This provides fine-grained control over tool usage by restricting the parameters that can be passed to each tool.
Configuration
allowed_params is a dictionary that maps tool names to lists of allowed parameter names. When configured, only the specified parameters will be accepted for that tool - any other parameters will be rejected with a 403 error.
mcp_servers:
  deepwiki_mcp:
    url: https://mcp.deepwiki.com/mcp
    transport: "http"
    auth_type: "none"
    allowed_params:
      # Tool name: list of allowed parameters
      read_wiki_contents: ["status"]

  my_api_mcp:
    url: "https://my-api-server.com"
    auth_type: "api_key"
    auth_value: "my-key"
    allowed_params:
      # Using unprefixed tool name
      getpetbyid: ["status"]
      # Using prefixed tool name (both formats work)
      my_api_mcp-findpetsbystatus: ["status", "limit"]
      # Another tool with multiple allowed params
      create_issue: ["title", "body", "labels"]
How It Works
- Tool-specific filtering: Each tool can have its own list of allowed parameters
- Flexible naming: Tool names can be specified with or without the server prefix (e.g., both
"getpetbyid"and"my_api_mcp-getpetbyid"work) - Whitelist approach: Only parameters in the allowed list are permitted
- Unlisted tools: If
allowed_paramsis not set, all parameters are allowed - Error handling: Requests with disallowed parameters receive a 403 error with details about which parameters are allowed
Example Request Behavior
With the configuration above, here's how requests would be handled:
✅ Allowed Request:
{
  "tool": "read_wiki_contents",
  "arguments": {
    "status": "active"
  }
}
❌ Rejected Request:
{
  "tool": "read_wiki_contents",
  "arguments": {
    "status": "active",
    "limit": 10  // This parameter is not allowed
  }
}
Error Response:
{
  "error": "Parameters ['limit'] are not allowed for tool read_wiki_contents. Allowed parameters: ['status']. Contact proxy admin to allow these parameters."
}
Use Cases
- Security: Prevent users from accessing sensitive parameters or dangerous operations
- Cost control: Restrict expensive parameters (e.g., limiting result counts)
- Compliance: Enforce parameter usage policies for regulatory requirements
- Staged rollouts: Gradually enable parameters as tools are tested
- Multi-tenant isolation: Different parameter access for different user groups
Combining with Tool Filtering
allowed_params works alongside allowed_tools and disallowed_tools for complete control:
mcp_servers:
  github_mcp:
    url: "https://api.githubcopilot.com/mcp"
    auth_type: oauth2
    oauth2_flow: authorization_code
    authorization_url: https://github.com/login/oauth/authorize
    token_url: https://github.com/login/oauth/access_token
    client_id: os.environ/GITHUB_OAUTH_CLIENT_ID
    client_secret: os.environ/GITHUB_OAUTH_CLIENT_SECRET
    scopes: ["public_repo", "user:email"]
    # Only allow specific tools
    allowed_tools: ["create_issue", "list_issues", "search_issues"]
    # Block dangerous operations
    disallowed_tools: ["delete_repo"]
    # Restrict parameters per tool
    allowed_params:
      create_issue: ["title", "body", "labels"]
      list_issues: ["state", "sort", "perPage"]
      search_issues: ["query", "sort", "order", "perPage"]
This configuration ensures that:
- Only the three listed tools are available
- The
delete_repotool is explicitly blocked - Each tool can only use its specified parameters
MCP Server Access Control
LiteLLM Proxy provides two methods for controlling access to specific MCP servers:
- URL-based Namespacing - Use URL paths to directly access specific servers or access groups
- Header-based Namespacing - Use the
x-mcp-serversheader to specify which servers to access
Method 1: URL-based Namespacing
LiteLLM Proxy supports URL-based namespacing for MCP servers using the format /<servers or access groups>/mcp. This allows you to:
- Direct URL Access: Point MCP clients directly to specific servers or access groups via URL
- Simplified Configuration: Use URLs instead of headers for server selection
- Access Group Support: Use access group names in URLs for grouped server access
URL Format
<your-litellm-proxy-base-url>/<server_alias_or_access_group>/mcp
Examples:
/github_mcp/mcp- Access tools from the "github_mcp" MCP server/zapier/mcp- Access tools from the "zapier" MCP server/dev_group/mcp- Access tools from all servers in the "dev_group" access group/github_mcp,zapier/mcp- Access tools from multiple specific servers
Usage Examples
- OpenAI API
- LiteLLM Proxy
- Cursor IDE
curl --location 'https://api.openai.com/v1/responses' \
--header 'Content-Type: application/json' \
--header "Authorization: Bearer $OPENAI_API_KEY" \
--data '{
    "model": "gpt-4o",
    "tools": [
        {
            "type": "mcp",
            "server_label": "litellm",
            "server_url": "<your-litellm-proxy-base-url>/github_mcp/mcp",
            "require_approval": "never",
            "headers": {
                "x-litellm-api-key": "Bearer YOUR_LITELLM_API_KEY"
            }
        }
    ],
    "input": "Run available tools",
    "tool_choice": "required"
}'
This example uses URL namespacing to access only the "github" MCP server.
curl --location '<your-litellm-proxy-base-url>/v1/responses' \
--header 'Content-Type: application/json' \
--header "Authorization: Bearer $LITELLM_API_KEY" \
--data '{
    "model": "gpt-4o",
    "tools": [
        {
            "type": "mcp",
            "server_label": "litellm",
            "server_url": "litellm_proxy",
            "require_approval": "never",
            "headers": {
                "x-litellm-api-key": "Bearer YOUR_LITELLM_API_KEY"
            }
        }
    ],
    "input": "Run available tools",
    "tool_choice": "required"
}'
This example uses the x-mcp-servers header to access all servers in the "dev_group" access group. Use server_url: "litellm_proxy" when calling the proxy's /v1/responses endpoint—do not use the full proxy URL.
{
  "mcpServers": {
    "LiteLLM": {
      "url": "<your-litellm-proxy-base-url>/github_mcp,zapier/mcp",
      "headers": {
        "x-litellm-api-key": "Bearer $LITELLM_API_KEY"
      }
    }
  }
}
This configuration uses URL namespacing to access tools from both "github" and "zapier" MCP servers.
Benefits of URL Namespacing
- Direct Access: No need for additional headers to specify servers
- Clean URLs: Self-documenting URLs that clearly indicate which servers are accessible
- Access Group Support: Use access group names for grouped server access
- Multiple Servers: Specify multiple servers in a single URL with comma separation
- Simplified Configuration: Easier setup for MCP clients that prefer URL-based configuration
Method 2: Header-based Namespacing
You can choose to access specific MCP servers and only list their tools using the x-mcp-servers header. This header allows you to:
- Limit tool access to one or more specific MCP servers
- Control which tools are available in different environments or use cases
The header accepts a comma-separated list of server aliases: "alias_1,Server2,Server3"
Notes:
- If the header is not provided, tools from all available MCP servers will be accessible
- This method works with the standard LiteLLM MCP endpoint
- OpenAI API
- LiteLLM Proxy
- Cursor IDE
curl --location 'https://api.openai.com/v1/responses' \
--header 'Content-Type: application/json' \
--header "Authorization: Bearer $OPENAI_API_KEY" \
--data '{
    "model": "gpt-4o",
    "tools": [
        {
            "type": "mcp",
            "server_label": "litellm",
            "server_url": "<your-litellm-proxy-base-url>/mcp/",
            "require_approval": "never",
            "headers": {
                "x-litellm-api-key": "Bearer YOUR_LITELLM_API_KEY",
                "x-mcp-servers": "alias_1"
            }
        }
    ],
    "input": "Run available tools",
    "tool_choice": "required"
}'
In this example, the request will only have access to tools from the "alias_1" MCP server.
curl --location '<your-litellm-proxy-base-url>/v1/responses' \
--header 'Content-Type: application/json' \
--header "Authorization: Bearer $LITELLM_API_KEY" \
--data '{
    "model": "gpt-4o",
    "tools": [
        {
            "type": "mcp",
            "server_label": "litellm",
            "server_url": "litellm_proxy",
            "require_approval": "never",
            "headers": {
                "x-litellm-api-key": "Bearer YOUR_LITELLM_API_KEY",
                "x-mcp-servers": "alias_1,Server2"
            }
        }
    ],
    "input": "Run available tools",
    "tool_choice": "required"
}'
This configuration restricts the request to only use tools from the specified MCP servers. Use server_url: "litellm_proxy" when calling the proxy's /v1/responses endpoint.
{
  "mcpServers": {
    "LiteLLM": {
      "url": "<your-litellm-proxy-base-url>/mcp/",
      "headers": {
        "x-litellm-api-key": "Bearer $LITELLM_API_KEY",
        "x-mcp-servers": "alias_1,Server2"
      }
    }
  }
}
This configuration in Cursor IDE settings will limit tool access to only the specified MCP servers.
Comparison: Header vs URL Namespacing
| Feature | Header Namespacing | URL Namespacing |
|---|---|---|
| Method | Uses x-mcp-servers header | Uses URL path /<servers>/mcp |
| Endpoint | Standard litellm_proxy endpoint | Custom /<servers>/mcp endpoint |
| Configuration | Requires additional header | Self-contained in URL |
| Multiple Servers | Comma-separated in header | Comma-separated in URL path |
| Access Groups | Supported via header | Supported via URL path |
| Client Support | Works with all MCP clients | Works with URL-aware MCP clients |
| Use Case | Dynamic server selection | Fixed server configuration |
- OpenAI API
- LiteLLM Proxy
- Cursor IDE
curl --location 'https://api.openai.com/v1/responses' \
--header 'Content-Type: application/json' \
--header "Authorization: Bearer $OPENAI_API_KEY" \
--data '{
    "model": "gpt-4o",
    "tools": [
        {
            "type": "mcp",
            "server_label": "litellm",
            "server_url": "<your-litellm-proxy-base-url>/mcp/",
            "require_approval": "never",
            "headers": {
                "x-litellm-api-key": "Bearer YOUR_LITELLM_API_KEY",
                "x-mcp-servers": "alias_1"
            }
        }
    ],
    "input": "Run available tools",
    "tool_choice": "required"
}'
In this example, the request will only have access to tools from the "alias_1" MCP server.
curl --location '<your-litellm-proxy-base-url>/v1/responses' \
--header 'Content-Type: application/json' \
--header "Authorization: Bearer $LITELLM_API_KEY" \
--data '{
    "model": "gpt-4o",
    "tools": [
        {
            "type": "mcp",
            "server_label": "litellm",
            "server_url": "litellm_proxy",
            "require_approval": "never",
            "headers": {
                "x-litellm-api-key": "Bearer YOUR_LITELLM_API_KEY",
                "x-mcp-servers": "alias_1,Server2"
            }
        }
    ],
    "input": "Run available tools",
    "tool_choice": "required"
}'
This configuration restricts the request to only use tools from the specified MCP servers.
{
  "mcpServers": {
    "LiteLLM": {
      "url": "litellm_proxy",
      "headers": {
        "x-litellm-api-key": "Bearer $LITELLM_API_KEY",
        "x-mcp-servers": "alias_1,Server2"
      }
    }
  }
}
This configuration in Cursor IDE settings will limit tool access to only the specified MCP server.
Grouping MCPs (Access Groups)
MCP Access Groups allow you to group multiple MCP servers together for easier management.
1. Create an Access Group
A. Creating Access Groups using Config:
mcp_servers:
  "deepwiki_mcp":
    url: https://mcp.deepwiki.com/mcp
    transport: "http"
    auth_type: "none"
    access_groups: ["dev_group"]
While adding mcp_servers using the config:
- Pass in a list of strings inside
access_groups - These groups can then be used for segregating access using keys, teams and MCP clients using headers
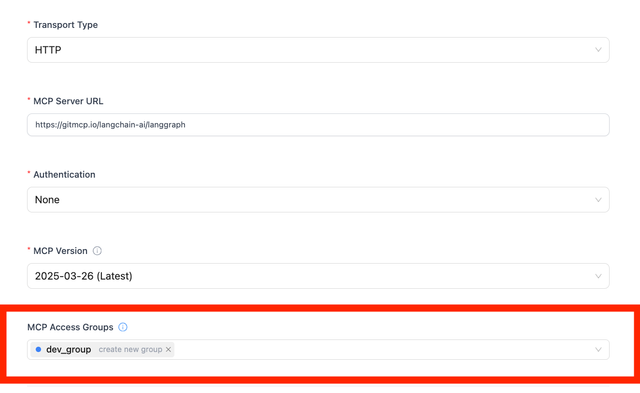
B. Creating Access Groups using UI
To create an access group:
- Go to MCP Servers in the LiteLLM UI
- Click "Add a New MCP Server"
- Under "MCP Access Groups", create a new group (e.g., "dev_group") by typing it
- Add the same group name to other servers to group them together
2. Use Access Group in Cursor
Include the access group name in the x-mcp-servers header:
{
  "mcpServers": {
    "LiteLLM": {
      "url": "litellm_proxy",
      "headers": {
        "x-litellm-api-key": "Bearer $LITELLM_API_KEY",
        "x-mcp-servers": "dev_group"
      }
    }
  }
}
This gives you access to all servers in the "dev_group" access group.
- Which means that if deepwiki server (and any other servers) which have the access group
dev_groupassigned to them will be available for tool calling
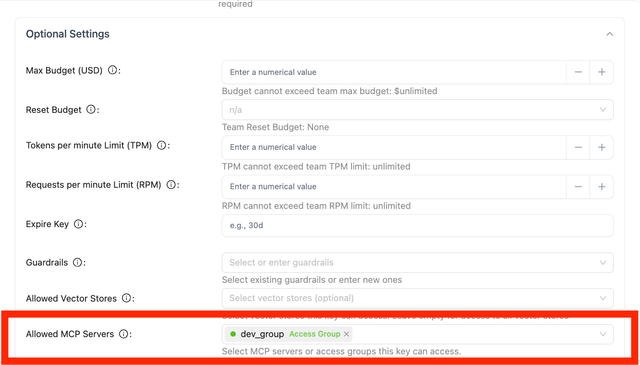
Advanced: Connecting Access Groups to API Keys
When creating API keys, you can assign them to specific access groups for permission management:
- Go to "Keys" in the LiteLLM UI and click "Create Key"
- Select the desired MCP access groups from the dropdown
- The key will have access to all MCP servers in those groups
- This is reflected in the Test Key page
Per-entity Tool-Level Permissions
Control which tools different teams can access from the same MCP server. For example, give your Engineering team access to list_repositories, create_issue, and search_code, while Sales only gets search_code and close_issue.
This video shows how to set allowed tools for a Key, Team, or Organization.
mcp_tool_permissions API
object_permission.mcp_tool_permissions is a Dict[server_id, List[tool_name]] on the key, team, end-user, agent, or organization. It's evaluated after server-level access has been resolved (see Permission Hierarchy above) and applies the same five-level intersection — most-restrictive wins, organization acts as a ceiling.
This is distinct from the server-registration-level allowed_tools / disallowed_tools (which apply to every caller of the server). mcp_tool_permissions lets you carve out per-team subsets without changing the server config.
- On a Key
- On a Team
- On an Agent
curl -X POST "http://localhost:4000/key/generate" \
  -H "Authorization: Bearer sk-master-key" \
  -H "Content-Type: application/json" \
  -d '{
    "object_permission": {
      "mcp_servers": ["github_mcp"],
      "mcp_tool_permissions": {
        "github_mcp": ["list_repositories", "create_issue", "search_code"]
      }
    }
  }'
curl -X POST "http://localhost:4000/key/generate" \
  -H "Authorization: Bearer sk-master-key" \
  -H "Content-Type: application/json" \
  -d '{
    "object_permission": {
      "mcp_servers": ["github_mcp"],
      "mcp_tool_permissions": {
        "github_mcp": ["search_code", "close_issue"]
      }
    }
  }'
curl -X POST "http://localhost:4000/team/new" \
  -H "Authorization: Bearer sk-master-key" \
  -H "Content-Type: application/json" \
  -d '{
    "team_alias": "engineering",
    "object_permission": {
      "mcp_servers": ["github_mcp", "deepwiki_mcp"],
      "mcp_tool_permissions": {
        "github_mcp": ["list_repositories", "create_issue", "search_code"]
      }
    }
  }'
When the key also sets mcp_tool_permissions for github_mcp, the resulting tool list is the intersection of the two.
When an agent (identified by x-litellm-agent-id) calls MCP tools, the agent's own mcp_tool_permissions participate in the intersection. Useful for capping what an autonomous agent can do regardless of which key originally invoked it.
curl -X PATCH "http://localhost:4000/v1/agents/{agent_id}" \
  -H "Authorization: Bearer sk-master-key" \
  -H "Content-Type: application/json" \
  -d '{
    "object_permission": {
      "mcp_servers": ["github_mcp"],
      "mcp_tool_permissions": {
        "github_mcp": ["search_code"]
      }
    }
  }'
Rate Limiting per MCP Server
Cap how many tool calls a key or team can make to a specific MCP server per minute with mcp_rpm_limit. This is a Dict[str, int] keyed by MCP server name, where the name is the server's alias if one is set, otherwise the configured server name. Each entry sets the requests-per-minute limit for that one server, so a limit on github does not affect calls to slack. Servers without an entry are uncapped.
Once the limit is exceeded within the window, further tool calls to that server return 429 Too Many Requests until the window rolls over. The cap only applies to actual MCP tool calls; it has no effect on regular LLM requests.
- On a Key
- On a Team
curl -X POST "http://localhost:4000/key/generate" \
  -H "Authorization: Bearer sk-master-key" \
  -H "Content-Type: application/json" \
  -d '{
    "mcp_rpm_limit": {"github": 100, "slack": 200},
    "object_permission": {"mcp_servers": ["github", "slack"]}
  }'
curl -X POST "http://localhost:4000/team/new" \
  -H "Authorization: Bearer sk-master-key" \
  -H "Content-Type: application/json" \
  -d '{
    "team_alias": "engineering",
    "mcp_rpm_limit": {"github": 500},
    "object_permission": {"mcp_servers": ["github"]}
  }'
mcp_rpm_limit is also accepted on /key/update, /team/update, /user/new, and /user/update. A key-level limit takes precedence over a team-level limit for the same server; the team limit otherwise applies to every key on the team as a shared counter.
Dashboard View Modes
Proxy admins can also control what non-admins see inside the MCP dashboard via general_settings.user_mcp_management_mode:
restricted(default) – users only see servers that their team explicitly has access to.view_all– every dashboard user can see the full MCP server list.
general_settings:
  user_mcp_management_mode: view_all
This is useful when you want discoverability for MCP offerings without granting additional execution privileges.
Publish MCP Registry
If you want other systems—for example external agent frameworks such as MCP-capable IDEs running outside your network—to automatically discover the MCP servers hosted on LiteLLM, you can expose a Model Context Protocol Registry endpoint. This registry lists the built-in LiteLLM MCP server and every server you have configured, using the official MCP Registry spec.
- Set
enable_mcp_registry: trueundergeneral_settingsin your proxy config (or DB settings) and restart the proxy. - LiteLLM will serve the registry at
GET /v1/mcp/registry.json. - Each entry points to either
/mcp(built-in server) or/{mcp_server_name}/mcpfor your custom servers, so clients can connect directly using the advertised Streamable HTTP URL.
The registry only advertises server URLs. Actual access control is still enforced by LiteLLM when the client connects to /mcp or /{server}/mcp, so publishing the registry does not bypass per-key permissions.