Codex CLI - Granular Cost Tracking
Track Codex CLI usage by customer or tags using LiteLLM proxy. This enables granular cost attribution for billing, budgeting, and analytics.
How It Works
Codex reads its configuration from ~/.codex/config.toml. The [model_providers.<id>] block accepts http_headers (static values) and env_http_headers (values read from environment variables when Codex starts), and Codex attaches both to every request it sends to base_url. This is the Codex equivalent of Claude Code's ANTHROPIC_CUSTOM_HEADERS: put a LiteLLM tracking header there and every /v1/responses call lands in the spend logs with that customer or those tags.
Why Set a Customer Header
Codex has no setting that puts an end user in the request body, so without a header its spend is attributed to the virtual key and nothing else. One header in config.toml gives every request an end user, and with it per-customer budgets, the End User filter on the Logs page, and /customer/info all work. Headers are checked before any request body field, so the value you set here always wins.
Option 1: Track by Customer
Use this to attribute costs to specific customers or end-users. x-litellm-customer-id and x-litellm-end-user-id both land as the end user of the spend row.
model = "gpt-5.3-codex"
model_provider = "litellm"

[model_providers.litellm]
name = "LiteLLM"
base_url = "http://localhost:4000/v1"
env_key = "LITELLM_API_KEY"
wire_api = "responses"
http_headers = { "x-litellm-end-user-id" = "alice" }
Option 2: Track by Tags
Use this to attribute costs to projects, cost centers, or environments. Pass comma-separated tags, on their own or next to a customer header in the same provider block.
[model_providers.litellm]
http_headers = { "x-litellm-customer-id" = "carol", "x-litellm-tags" = "project:onboarding,team:platform" }
Option 3: Per-Developer Value from an Environment Variable
A shared config.toml cannot hard-code each developer's id. env_http_headers names an environment variable instead, so the file stays identical across machines and each developer runs export LITELLM_END_USER_ID=alice before launching Codex. When the variable is unset or empty, Codex omits the header.
[model_providers.litellm]
env_http_headers = { "x-litellm-end-user-id" = "LITELLM_END_USER_ID" }
Option 4: Custom Header Name
If your developers already carry an identity header, name it under general_settings in the proxy config.yaml with user_header_name and LiteLLM reads that header as the customer id too. The customer id precedence table lists user_header_mappings as the newer way to declare such a header.
general_settings:
  user_header_name: x-okta-user
[model_providers.litellm]
env_http_headers = { "x-okta-user" = "CODEX_OKTA_USER" }
Quick Start
1. Configure and Run Codex
Add the provider block from Option 1 to ~/.codex/config.toml, then export your LiteLLM key and start Codex.
export LITELLM_API_KEY=sk-<your-api-key>
codex
All requests will now be tracked under the end user alice. Each Codex turn makes two /v1/responses calls and both are attributed, so one turn shows up as two spend rows.
2. View Usage in LiteLLM UI
Navigate to the Logs tab in the LiteLLM UI (http://localhost:4000/ui/?page=logs). The End User column shows the header value on every Codex row, and the Tags column carries your x-litellm-tags entries next to the User-Agent: codex-tui tag LiteLLM adds on its own.
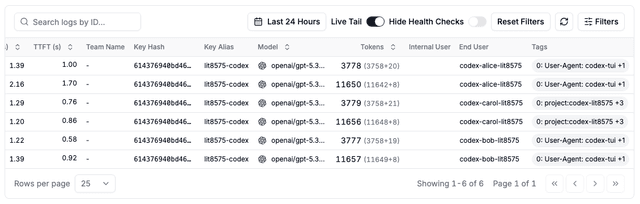
Open Filters and pick an end user to see only that developer's requests. Click on a request to see details, including the model, the aresponses call type, and the cost.
3. Query Spend per Customer
The same rows are available over the API. /customer/info?end_user_id=alice returns that customer's all-up spend, and the Enterprise /global/spend/report endpoint with group_by=customer breaks spend down per customer and day.
Supported Headers
| Header | Description |
|---|---|
x-litellm-customer-id | Track by customer/end-user ID |
x-litellm-end-user-id | Alternative customer ID header |
x-litellm-tags | Comma-separated tags for cost attribution |
Header named by user_header_name | Custom customer ID header configured on the proxy |

