Agent Permission Management
Control which A2A agents can be accessed by specific keys or teams in LiteLLM.
Overview
Agent Permission Management lets you restrict which agents a LiteLLM Virtual Key or Team can access. This is useful for:
- Multi-tenant environments: Give different teams access to different agents
- Security: Prevent keys from invoking agents they shouldn't have access to
- Compliance: Enforce access policies for sensitive agent workflows
When permissions are configured:
GET /v1/agentsonly returns agents the key/team can accessPOST /a2a/{agent_id}(Invoking an agent) returns403 Forbiddenif access is denied
Setting Permissions on a Key
This example shows how to create a key with agent permissions and test access.
1. Get Your Agent ID
- UI
- API
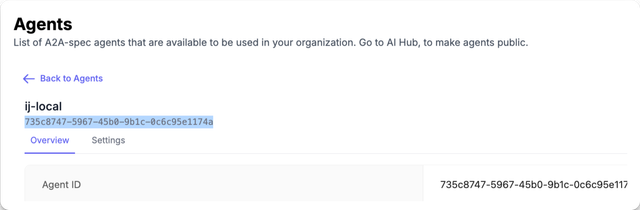
- Go to Agents in the sidebar
- Click into the agent you want
- Copy the Agent ID
curl "http://localhost:4000/v1/agents" \
  -H "Authorization: Bearer sk-master-key"
Response:
{
  "agents": [
    {"agent_id": "agent-123", "name": "Support Agent"},
    {"agent_id": "agent-456", "name": "Sales Agent"}
  ]
}
2. Create a Key with Agent Permissions
- UI
- API
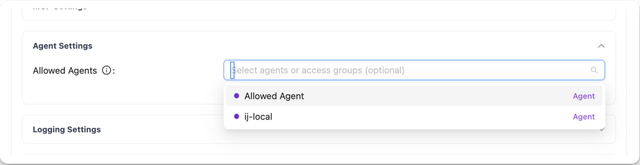
- Go to Keys → Create Key
- Expand Agent Settings
- Select the agents you want to allow
curl -X POST "http://localhost:4000/key/generate" \
  -H "Authorization: Bearer sk-master-key" \
  -H "Content-Type: application/json" \
  -d '{
    "object_permission": {
      "agents": ["agent-123"]
    }
  }'
3. Test Access
Allowed agent (succeeds):
curl -X POST "http://localhost:4000/a2a/agent-123" \
  -H "Authorization: Bearer sk-your-new-key" \
  -H "Content-Type: application/json" \
  -d '{"message": {"role": "user", "parts": [{"type": "text", "text": "Hello"}]}}'
Blocked agent (fails with 403):
curl -X POST "http://localhost:4000/a2a/agent-456" \
  -H "Authorization: Bearer sk-your-new-key" \
  -H "Content-Type: application/json" \
  -d '{"message": {"role": "user", "parts": [{"type": "text", "text": "Hello"}]}}'
Response:
{
  "error": {
    "message": "Access denied to agent: agent-456",
    "code": 403
  }
}
Setting Permissions on a Team
Restrict all keys belonging to a team to only access specific agents.
1. Create a Team with Agent Permissions
- UI
- API
- Go to Teams → Create Team
- Expand Agent Settings
- Select the agents you want to allow for this team
curl -X POST "http://localhost:4000/team/new" \
  -H "Authorization: Bearer sk-master-key" \
  -H "Content-Type: application/json" \
  -d '{
    "team_alias": "support-team",
    "object_permission": {
      "agents": ["agent-123"]
    }
  }'
Response:
{
  "team_id": "team-abc-123",
  "team_alias": "support-team"
}
2. Create a Key for the Team
- UI
- API
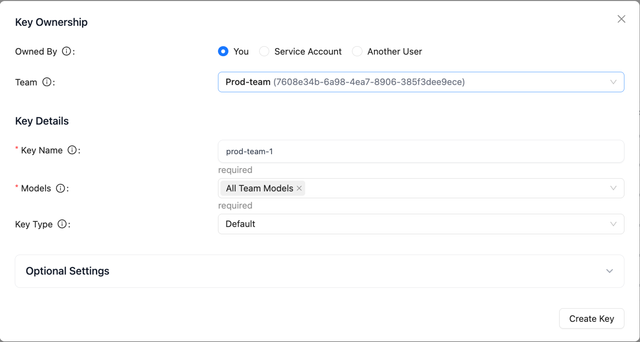
- Go to Keys → Create Key
- Select the Team from the dropdown
curl -X POST "http://localhost:4000/key/generate" \
  -H "Authorization: Bearer sk-master-key" \
  -H "Content-Type: application/json" \
  -d '{
    "team_id": "team-abc-123"
  }'
3. Test Access
The key inherits agent permissions from the team.
Allowed agent (succeeds):
curl -X POST "http://localhost:4000/a2a/agent-123" \
  -H "Authorization: Bearer sk-team-key" \
  -H "Content-Type: application/json" \
  -d '{"message": {"role": "user", "parts": [{"type": "text", "text": "Hello"}]}}'
Blocked agent (fails with 403):
curl -X POST "http://localhost:4000/a2a/agent-456" \
  -H "Authorization: Bearer sk-team-key" \
  -H "Content-Type: application/json" \
  -d '{"message": {"role": "user", "parts": [{"type": "text", "text": "Hello"}]}}'
Agent Access Groups
Granting individual agents to every key or team gets unwieldy as the agent catalog grows. Agent access groups let you tag agents with logical labels in the dashboard, then grant the group to a key or team. Adding a new agent to the group automatically makes it available to every key/team that holds the group.
1. Tag the agent with one or more groups
In the LiteLLM dashboard:
- Go to Agents.
- Create or edit an agent.
- Under Access Groups, type a group name (e.g.
clinical-tools) and press Enter.
Tagging an agent with access groups is currently a dashboard-only operation. The POST /v1/agents body schema does not expose agent_access_groups as a top-level field; the group tags persist via the underlying DB column and are consumed during permission resolution.
2. Grant a key or team the group
curl -X POST "http://localhost:4000/key/generate" \
  -H "Authorization: Bearer sk-master-key" \
  -H "Content-Type: application/json" \
  -d '{
    "object_permission": {
      "agent_access_groups": ["clinical-tools", "research-tools"]
    }
  }'
The key now has access to every agent tagged with either group, with no per-agent enumeration required. The same agent_access_groups field is also valid on a team's object_permission.
When a key has both a direct agents list and agent_access_groups, the union is computed (any agent reached by either path is allowed), and then the team-level intersection is applied as described below.
How It Works
A2A permission resolution operates over two levels: Key and Team. (MCP's permission hierarchy extends to End-user / Agent / Org additionally; agent permissions are a narrower model today.)
| Key Permissions | Team Permissions | Result | Notes |
|---|---|---|---|
| None | None | Key can access all agents | Open access by default when no restrictions are set |
["agent-1", "agent-2"] | None | Key can access agent-1 and agent-2 | Key uses its own permissions |
| None | ["agent-1", "agent-3"] | Key can access agent-1 and agent-3 | Key inherits team's permissions |
["agent-1", "agent-2"] | ["agent-1", "agent-3"] | Key can access agent-1 only | Intersection of both lists (most restrictive wins) |
agent_access_groups: ["clinical"] | None | Key can access every agent tagged clinical | Access groups resolved to concrete agent IDs |
agent_access_groups: ["clinical"] | agents: ["agent-1"] | Intersection of (every agent tagged clinical) and ["agent-1"] | Mixing direct and group grants is supported |
Viewing Permissions
- UI
- API
- Go to Keys or Teams
- Click into the key/team you want to view
- Agent permissions are displayed in the info view
curl "http://localhost:4000/key/info?key=sk-your-key" \
  -H "Authorization: Bearer sk-master-key"

